Databricks
Summary
This document covers the information to gather from Databricks in order to configure a Qarbine data service. The data service will use the Qarbine Databricks driver. You can define multiple data services that access the same Databricks endpoint though with varying credentials. Once a data service is defined, you can manage which Qarbine principals have access to it and its associated Databricks data. A Qarbine administrator has visibility to all data services.
Overview
Databricks is a unified analytics platform that facilitates data engineering, data science, and machine learning tasks. It operates on a hybrid Platform-as-a-Service (PaaS) model, where the control plane is managed by Databricks and the data plane runs in the user’s cloud account. Databricks offers tools for data storage, processing, and visualization. For more details see the documentation at https://docs.databricks.com/en/getting-started/overview.html.
DataBricks Configuration
Determining the Network Settings
Sign on to your Databricks account at https://accounts.cloud.databricks.com/
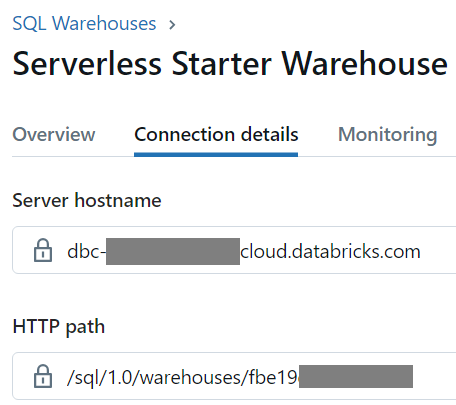
The network settings needed to configure Qarbine to access DataBricks are:
- server host name for your cluster or SQL warehouse and
- HTTP Path value for your cluster or SQL warehouse.
The steps to do this are described at
https://docs.databricks.com/en/integrations/compute-details.html
Shown below is the page with the settings for a SQL warehouse.
Using Service Principal Access
Qarbine can use the Databricks OAuth M2M authentication. This is described at
https://docs.databricks.com/en/dev-tools/nodejs-sql-driver.html#oauth-machine-to-machine-m2m-authentication
First, create a Databricks service principal in your Databricks workspace, and create an OAuth secret for that service principal. The steps to perform this task are described at
https://docs.databricks.com/en/dev-tools/auth/oauth-m2m.html.
Next, create the service principal and its OAuth secret, see Use a service principal to authenticate with Databricks (OAuth M2M). Make a note of the:
- the service principal’s UUID or Application ID value, and
- the secret value for the service principal’s OAuth secret.
Give the service principal access to your cluster or warehouse. See Compute permissions information at https://docs.databricks.com/en/compute/clusters-manage.html#cluster-level-permissions
or Manage a SQL warehouse at
https://docs.databricks.com/en/compute/sql-warehouse/create.html#manage
Using a Personal Access Token
Information on setting this up can be found at the following link.
https://docs.databricks.com/en/dev-tools/nodejs-sql-driver.html#databricks-personal-access-token-authentication
Qarbine Configuration
Compute Node Preparation
Determine which compute node service endpoint you want to run this data access from. That URL will go into the Data Service’s Compute URL field. Its form is “https://domain:port/dispatch”. A sample is shown below.

The port number corresponds to a named service endpoint configured on the given target host. For example, the primary compute node usually is set to have a ‘main’ service. That service’s configuration is defined in the ˜./qarbine.service/config/service.main.json file. Inside that file the following driver entry is required
"drivers" :[
 . . .
"./driver/databricksDriver.js"
]
The relevant configuration file name for non primary (main) Qarbine compute nodes is service.NAME.json. Remember to have well formed JSON syntax or a startup error is likely to occur. If you end up adding that entry then restart the service via the general command line syntax
pm2 restart <service>
For example,
pm2 restart main
or simply
pm2 restart all
Data Service Definition
Open the Administration Tool.
Navigate to the Data Services tab.

A data service defines on what compute node a query will run by default along with the means to reach to target data. The latter includes which native driver to use along with settings corresponding to that driver. Multiple Data Sources can reference a single Data Service. The details of any one Data Service are thus maintained in one spot and not spread out all over the place in each Data Source. The latter is a maintenance and support nightmare.
To begin adding a data service click

On the right hand side enter a name and optionally a description.

Set the Compute URL field based on the identified compute node above. Its form is “https://domain:port/dispatch”. A sample is shown below.
Also choose the “dataBricks” driver.

The default is to not propagate log messages from the Databricks Node.js driver to the console. To change it set the option below to on of error, warning, info, or debug. For the ‘info’ logging level Databricks error, warning, and info messages are shown.

The server template is the Databricks host name. An example is shown below.

You can reference environment variables using the syntax %NAME%. Any strings should be quoted and the key\value pairs separated by commas.
The server options provide your authorization information. This can be the keys and values separated by a comma as shown below which uses the service principal access approach.
httpPath = "/sql/1.0/warehouses/fbe19XXXXXXXXX",
authType =  "databricks-oauth",
oauthClientId =  "PRINCIPAL_UUID",
oauthClientSecret = "PRINCIPAL_SECRET"

To use the personal access token approach the syntax is
httpPath = "/sql/1.0/warehouses/fbe19XXXXXXXXX",
token =  "PERSONAL_ACCESS_TOKEN"
DataBricks enables multiple catalogs to be managed within a single workspace. Enter the catalog name in the “Database” entry field as shown below.

Test your settings by clicking on the toolbar image highlighted below.

The result should be

Save the Data Service by clicking on the image highlighted below.

The data service will be known at the next log on time. Next, see the DataBricks query interaction and any tutorial for information on interacting with DataBricks from Qarbine.
References
For more information see https://docs.databricks.com/.